AssetTrack for Windows Mobile
AssetTrack for Windows Mobile
AssetTrack for Windows Mobile allow users to capture information for one or more assets in a point-and-shoot fashion using a barcode scanner. By eliminating manual data entry by using barcodes and providing portable mobile computers, asset tracking can be made a great deal easier than using traditional desktop-based applications.
AssetTrack Mobile forms are useful in scenarios like:
- Inventories and audits where data collectors are sweeping through an environment to capture assets deployed in the field
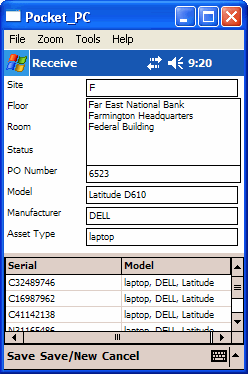
- Receiving where large numbers of assets arriving at the receiving dock
- Disposals where assets are being prepared for removal from the company's books
- IMACs where technicians are installing or replacing new equipment
AssetTrack Mobile forms can be tailored to meet specific needs by adding new fields, changing labels, business rules and validation so that other data collection activities can be performed.
Anatomy of an AssetTrack Mobile Form
AssetTrack Mobile forms are broken into two sections:

| Section | Description |
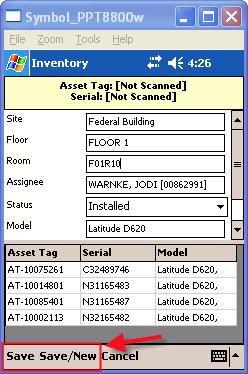
| Form Fields | The top portion of the form that contains data fields that will be applied to all assets scanned into the Asset List. In the example above, all assets scanned into the asset list will be assigned to the Seattle Development Office, Floor 1, Receiving Dock location. |
| Asset Grid | The list of assets that is collected using this form. Each unique serial number that is scanned adds a new asset to the asset list on this form. This way you can create or update a large number of asset records by completing the form once, and then scanning a collection of serial numbers or asset tags. |
Entering Data into the Form Fields
When completing an AssetTrack Mobile form, enter the values into the Form Fields section first, then scan in your asset records. There are a number of ways to enter data into the Form Fields section of the form:
- Scanning a location or product barcode on a printed scan sheet
- Selecting a value from an auto-complete search
- Using the scan sheet keyboard to scan in a value letter by letter
- Tapping into a field and using the virtual keyboard to manually enter data
Selecting a value from an auto-complete search
Most form fields are backed by an auto-complete search system, so that as you type in a value using the virtual keyboard, matching records from the database are presented for you to choose from. To use auto-complete:
- Tap into a field to get your cursor blinking in that field.
- Use the virtual keyboard to tap in the first few letters of the value. For example, if entering data into the Site field, tap in the first few characters of the Site. Matching Sites will be displayed directly underneath the Site form field.
- Tap on a value from the auto-complete search results list to select that value.
Using the scan sheet keyboard to scan in a value letter by letter
AssetTrack comes with a default scan sheet that displays each letter of the alphabet as a barcode. Scan these barcodes to "type" using the barcode scanner. This is an alternative to using the virtual keyboard.
Tapping into a field and using the virtual keyboard to manually enter data
You can always simply use the virtual keyboard to manually key in data.
Scanning Assets into the Asset List
Once your form is completed, you can begin scanning assets into the list.
Key Fields
Key fields are the fields which can be used to uniquely identify an asset record. There are two: asset tag and serial number. To add an asset to the asset list, you must scan each of the key fields included in the asset grid. If only the serial number field is in the Asset list, then you only need to scan the serial number. If only the asset tag, then you only need to scan the asset tag.
Adding an asset by scanning a single key field
If there is only one key field in the asset list, then simply scanning the key value will add the new asset to the list.
Adding an asset by scanning multiple key fields
If there are both asset tag and serial number in the asset list, you must scan both. When this configuration exists, AssetTrack Mobile will display a status box at the top of the form and you will then have to scan both key fields to add an asset to the list.
To add an asset requiring both key fields to be scanned:
- Complete the form fields as normal.
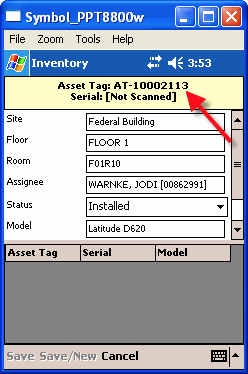
- Scan the first key field in the asset list. The yellow status box at the top of the form indicating that the first key field (in this case the asset tag) has been scanned and the device is waiting for the second (in this case the serial number).
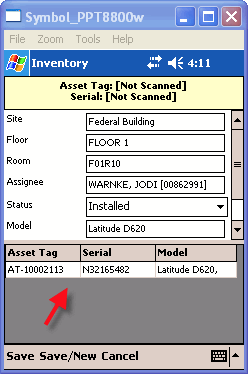
- Scan the second key field. The asset will be added to the asset list and the yellow status box will be cleared indicating you are ready to move on to the next asset.
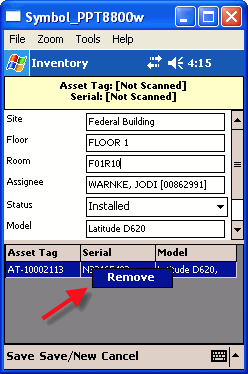
Removing Assets from the Asset List
To remove assets from the asset list:
- Tap and hold on the row in the asset grid until the context menu appears.
- Tap Remove from the context menu.
Saving the Form
When you have finished scanning assets into your form, you need to save the form to store the changes on your mobile device database. To save your form data:
- Tap the Save menu option to save the form and return to the main menu or tap Save/New to save the form and start a new form.