Importing Data into AssetTrack Using the File Import Service
When using AssetTrack’s mobile devices and web forms to collect asset information, it’s desirable to reference existing information like assets, locations, products, employees, departments. This helps to ensure fast, accurate, and consistent data collection.
AssetTrack has an import process for loading this data into itself. This process is capable of importing from different types of sources, but this document deals only with importing data from files. In a nutshell, you export XML or TSV files containing the data that you want to be imported into AssetTrack. This can include data for assets, employees, products, locations, and departments. You place these files in a specific directory that is monitored by the file importer. At scheduled intervals, the file importer looks for these files and imports them into AssetTrack. Your data is then available on your mobile device forms and web forms.
Setting up the Import Service
The importer typically runs on the same machine as AssetTrack Server but can run on a different machine if necessary.
The file importer is installed as a separate component from other AssetTrack components and has its own installer named ImportService_X.X.XXX.X.msi where the “X”s are the specific version number. It installs to C:\Program Files\AMI\Import Service by default but can be installed to any filesystem location.
Once installed, you should see files installed to C:\Program Files\AMI\Import Service. The following table lists files of note:
File name | Description |
ManualImporter.exe | This is the Microsoft .NET 2.0 executable program that performs the import.
Because this executable takes in flags/switches that you won’t have memorized, you will probably never execute this file directly, but rather execute it via batch files. |
DebugImport.bat | This runs the importer in “debug mode”, which means that it runs an actual import with verbose logging turned on. This means that it prints to the console window and also writes a file.
This batch file is useful when validating your configuration and for checking the validity of your file set. |
ImportService.exe.config | Configuration file for ManualImporter.exe. You will never open this file unless you’re “repointing” the importer to point to a different AssetTrack database. |
ImportService.exe | Deprecated. Do not use. |
AMI AssetTrack Importer (Windows Scheduled Task) | This is not a file, but a Windows Scheduled Task that was created by the installer. This Scheduled Task is scheduled for 1am (server time) by default, and runs the importer in “production mode” without a console window and without producing a log file. Events are, however, still logged to the Windows Event Viewer. |
You will also see that the installer created the subdirectories listed in the table below. These subdirectories are the default/suggested file handoff locations for file exchange. They can be changed if different locations are desired.
Directory name | Description |
Incoming | The “pickup” directory that the importer will search for files to import. |
Outgoing | The “delivery” directory where the exporter places files that are outbound from AssetTrack to an external repository. |
Error | The directory where the import files are placed when there is a fatal problem with the import attempt. |
Archive | The directory where the import files are placed after a successful import. |
Configuring the Import Service
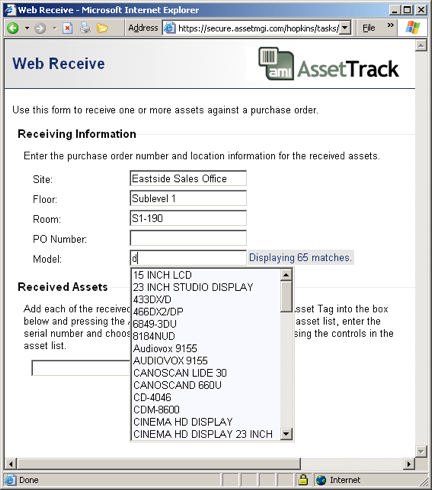
The importer is configured using AssetTrack Server’s web front-end. After logging into the AssetTrack web application, click on the “Settings” link at the top left.
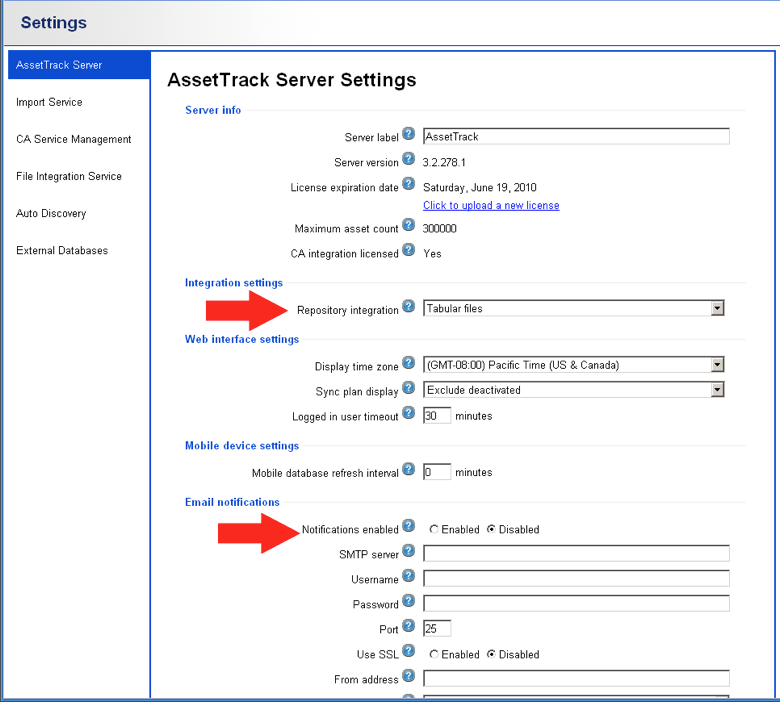
Figure 3: On the "AssetTrack Server" tab, specify the file import type, which will be tabular files or XML files. Specify email notification information if that’s desirable to you. This will send you email if the importer fails.

Figure 4: In the "Import Service" area, you should specify the server name and virtual directory name of the AssetTrack Server. The importer uses this information to inform the server of successful imports.
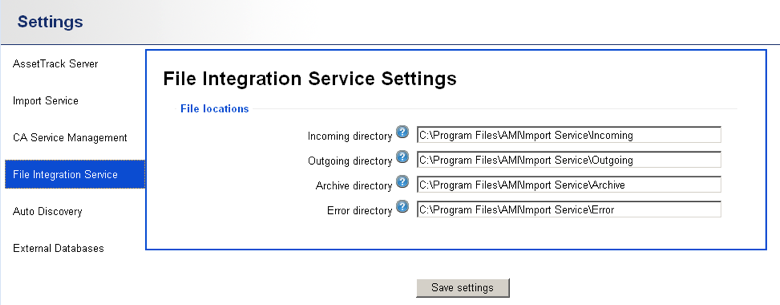
Figure 5: This settings screen specify the various directories that are used by the importer.
The Import File Specifications
A detailed specification of the file formats needed by the File Importer are defined in Import file format specifications.
Deactivation and reactivation
When data is removed from your repository (or goes inactive), it is deactivated in AssetTrack (versus being deleted). If you’ve deleted a record or you simply wish certain records to not show up in AssetTrack, you can just stop providing the records in the XML data and AssetTrack will deactivate it accordingly. If the same record shows up later, it will be reactivated in AssetTrack.
Full Import versus Changes Only
For each daily import, import process expects to have a full snapshot of your repository data (versus changes only). In other words, if you have 100 assets in your repository and only one asset has changed since the last import, the import process still needs all 100 assets. This applies to all sets of data.
Logging and monitoring
The importer logs to the local Windows Event Viewer. The importer can be configured with a range of verbosity settings so provide more or less logging information.