Integrating AssetTrack with ServiceNow
With AssetTrack, ServiceNow customers can now streamline asset lifecycle tracking using AssetTrack's enterprise-class barcode and RFID tracking solution. This includes receiving, IMAC, retirement, physical inventory & audit functions using smartphones, scanners, RFID readers, spreadsheets and a programming API.
System Requirement
The AssetTrack ServiceNow integration requires an instance of AssetTrack Server, which is licensed from AMI. Contact sales@amitracks.com for a quote. The integration is easily added to an existing AssetTrack installation version 3.6 or greater by applying a new license key. Customers on previous versions must upgrade to version 3.6 before the ServiceNow integration module can be installed.
Architecture
AssetTrack integrates with ServiceNow using the ServiceNow JSON Web Service. Data flows to ServiceNow through a certified integration which you must install on your ServiceNot Eureka or Fuji instance.
.png?version=1&modificationDate=1433442918362&cacheVersion=1&api=v2&width=608&height=250)
Supported ServiceNow Versions
AssetTrack integrates out-of-box with ServiceNow version Eureka or later
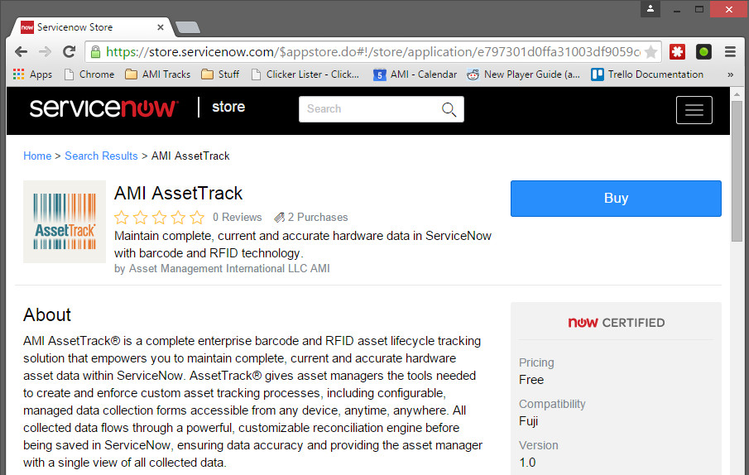
Buying the Integration from the Fuji App Store
You can purchase the AssetTrack ServiceNow application here. You can click the Buy button in the top right corner and then you will need to enter in your HI portal credentials. Once you have finished buying the AssetTrack application you can go to your ServiceNow instance to insall.
Installing the AssetTrack Certified Integration into your ServiceNow Instance
Go to your ServiceNow instance at <instance>.service-now.com. To install the AssetTrack application follow the following steps.
- Search for Application in the search bar in the top left corner of the screen.
- Click Applications under System Applications.
- Click the Downloads button and you can click install on your AssetTrack application.
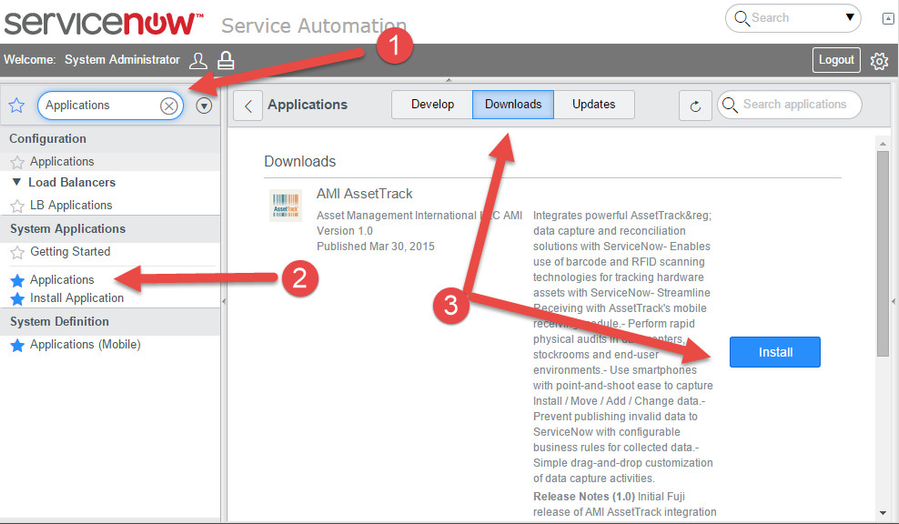
- After the install completes, you must configure your ServiceNow instance for AssetTrack found below.
Configuring ServiceNow for AssetTrack Integration
You need to make a few configuration changes to your ServiceNow instance after you install the AssetTrack Certified Integration.
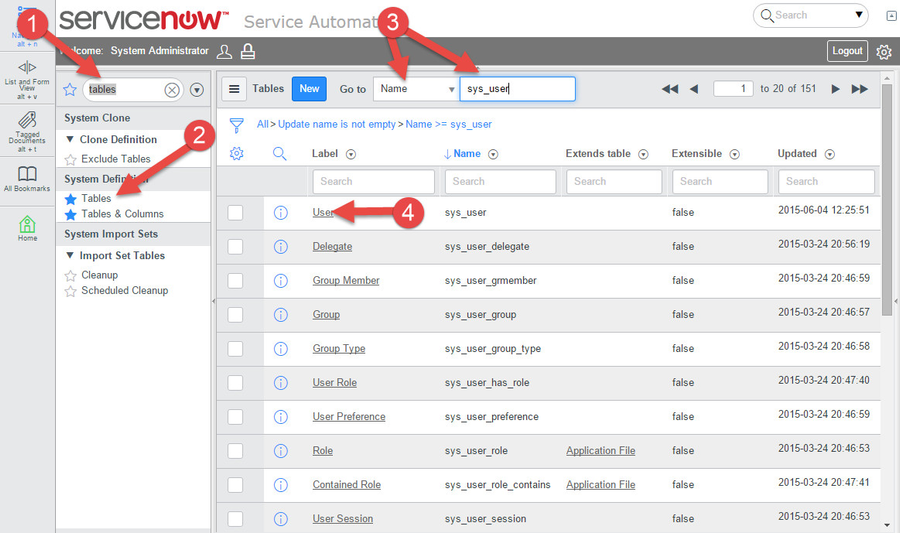
- Update sys_user by searching tables.
- Select Tables under System Definition.
- Change the search to name and search for sys_user.
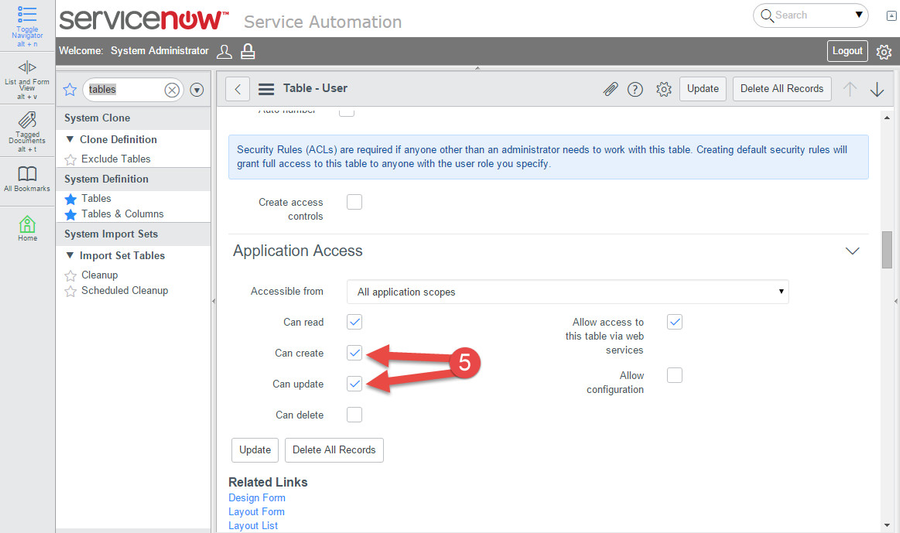
- Select User
- Make sure it has access to include can create, can update for all application scopes, this assumes the default of can read and allow access to this table via web services are still enabled.
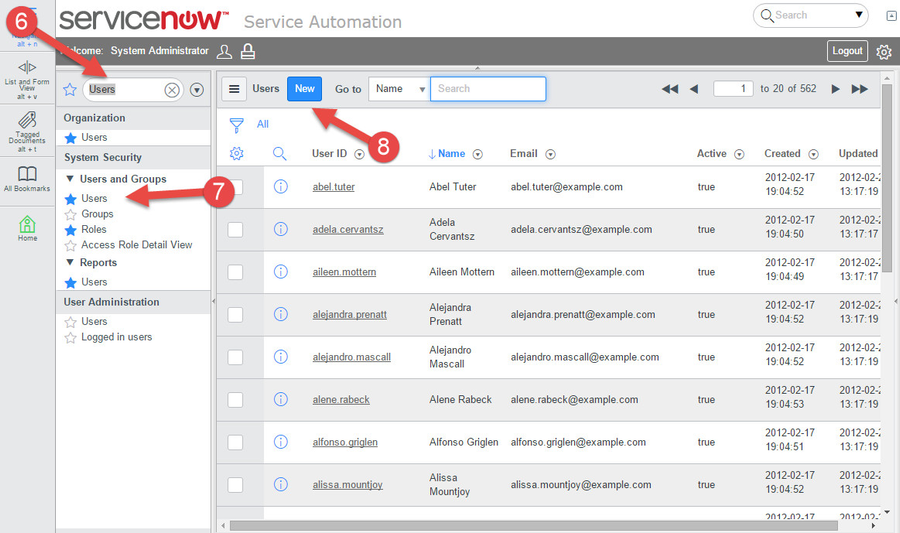
- Create a user for the AssetTrack server to use as a service user, search for users
- Select Users under Users and Groups
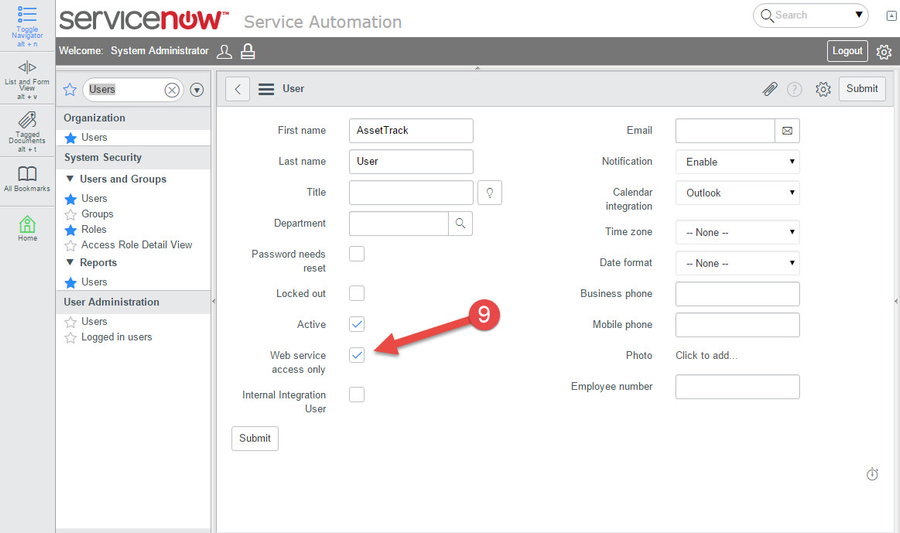
- Click New
- Make sure the Web Service Access only box is checked.
- Go to the new User and select Edit for Roles.
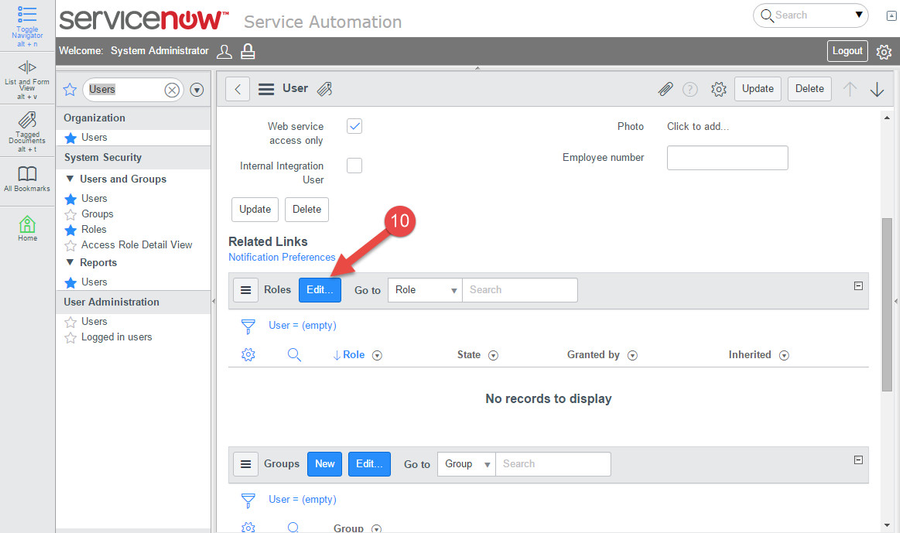
- Add the x_amiam_assettrack_importer role to the user.

Configuring AssetTrack for ServiceNow Integration
Then, you need to make a few configuration updates to your AssetTrack Server so that it can connect to your ServiceNow instance.
Overview
Download the preprocessor and handler configuration files from AMI.
- Update these configuration files to include the URL of your ServiceNow instance.
Go to the settings page of your AssetTrack server.
- Set your integration settings to Tabular Files.
- In the ServiceNow tab, enter in your ServiceNow user name and password.
- Set the ServiceNow endpoint to your ServiceNow instance.
- Upload the edited preprocessor conifg file you created.
- Upload the handler config file.
- Upload the Mapping file.
- Save your settings.
Customizing AssetTrack ServiceNow Configuration Files
There are two ServiceNow specific JSON formatted configuration files that need to be imported into AssetTrack, click the following links to download. The preprocessor config defines what information to bring down from ServiceNow and how to map it into AssetTrack.
The preprocessor config has the following format:
You must edit the BaseUri to be your instance of ServiceNow.
{
  "BaseUri": "https://instance.service-now.com/",
  "TableMaps": [
    {
      "TableName": "core_company",
      "FisFileName": "Vendor",
      "QueryFilter": "vendor=true",
      "RecordCount": 1000,
      "ColumnMaps": [
        {
          "SourceColumn": "sys_id",
          "DestinationColumn": "ExternalId",
          "Regex": null
        },
        {
          "SourceColumn": "name",
          "DestinationColumn": "Name",
          "Regex": null
        }
      ]
    },
    {
      "TableName": "cmn_location",
      "FisFileName": "Location",
      "QueryFilter": null,
      "RecordCount": 1000,
      "ColumnMaps": [
        {
          "SourceColumn": "parent",
          "DestinationColumn": "ParentExternalId",
          "Regex": null
        },
        {
          "SourceColumn": "sys_id",
          "DestinationColumn": "ExternalId",
          "Regex": null
        },
        {
          "SourceColumn": "name",
          "DestinationColumn": "Name",
          "Regex": null
        }
      ]
    }]
}
Property Definitions:
- BaseUri represents the ServiceNow instance.
- TableMaps is an array of mappings for ServiceNow tables to FIS import files.
- TableName is the ServiceNow table.
- FisFileName is the file name for the generated FIS file.
- QueryFilter is a filter to limit records retrieved from the ServiceNow table.
- RecordCount specifies how many records to retrieve at a time.
- ColumnMaps is an array of mappins of ServiceNow table columns to FIS file columns.
- SourceColumn is the name of the column in SerivceNow.
- DestinationColumn is the name of the column in the FIS file.
- Regex is a regex to apply to the value retrieved from ServiceNow.
In 4.11 we added the SourceColumns, SourceColumnsOutput and OutputSeparator property to support concatenating multiple source fields into a single AssetTrack field.
Example:
SourceColumns: ["city", "state"]
SourceColumnsOutput: "{0}, {1}"
Would result with:
Location name: Howell, Michigan
Example:
SourceColumns: ["city", "state"]
SourceColumnsOutput: "{1}, {0}"
Would result with:
Location name: Michigan, Howell
Example:
SourceColumns: ["city", "state"]
SourceColumnsOutput: "{1}_ {0}"
Would result with:
Location name: Michigan_ Howell
Default values are joined by " - " if SourceColumnsOutput is not specified. The default separator can be overridden with OutputSeparator.
Example:
SourceColumns: ["city", "state"]
OutputSeparator: "_"
Would result with:
Location name: Howell_ Michigan
Applying the Service Account Credentials to AssetTrack
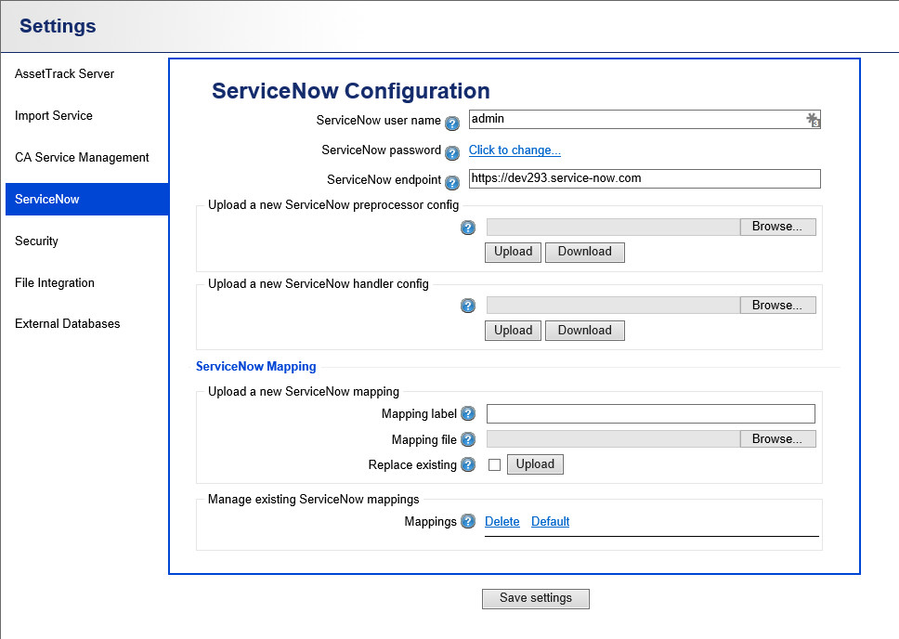
To set up AssetTrack for ServiceNow you must go to your AssetTrack server webpage, and go to your settings page. On the main screen of the settings page, scroll down to Integration Settings and set Repository integration to Tabular Files.

After that is set click on the ServiceNow tab on the left hand side of the screen. Here you will need to enter the AssetTrack user name and password you created in the steps earlier. Set your ServiceNow endpoint to be your ServiceNow instance. Next, you can upload your edited preprocessor and proper handler config file to the AssetTrack server.
Uploading the Default JSON Mapping File
Mapping files allow you to change how fields in AssetTrack map to fields in ServiceNow. If you haven't made many modifications ot the ServiceNow schema, simply use the default mapping files provided below.
- Fuji Default Mapping File - No Proxy
- Fuji Default Mapping File - With Proxy Settings
- Eureka Default Mapping File
After you downloaded the proper mapping file, go to the ServiceNow settings page on your AssetTrack server website. Under ServiceNow Mapping, browse for your mapping file and upload it to the AssetTrack server.
If you are using a proxy to connect to your Fuji ServiceNow instance, you must download the file, Fuji Default Mapping File - With Proxy Settings, and edit all properties under the property named, "proxy". If your proxy does not require credentials, you can delete that section entirely.
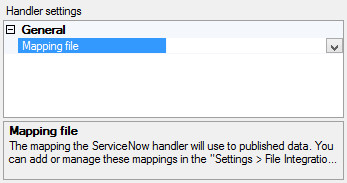
Configuring Forms to Connect to ServiceNow
When making or configuring your AssetTrack forms you must attach the correct handler to your forms on the form designer in the Management Console, for more information see Attaching Handlers . Once in the form designer under publishing you can add the ServiceNow App Task Handler to your forms shown below.
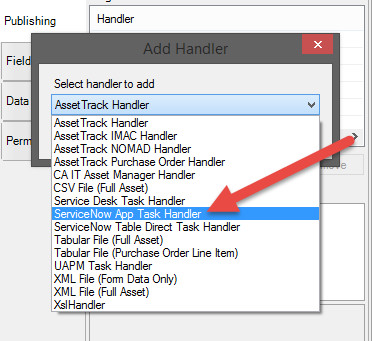
After the handler has been added, select it in the Registered Handlers window and below that a Handler settings box will populate. There you must select the mapping handler that you uploaded to the AssetTrack server.