What is the Queue?
When data is collected and uploaded by AssetTrack Mobile devices or via AssetTrack Server, the data is put in a staging location called the "Queue." This is done so that an asset manager can review the data before it is applied to the repository. This process is important to ensure that the data meets your particular standards of quality before the database is updated.
The Queue allows you to:
- View collected data in an Excel-like tabular format
- Automatically scan collected data for problems
- Automatically detect what data is changing for existing asset records
- Make changes to collected data before it is applied to the repository
- Export collected data to an Excel spreadsheet for reporting or database audit
What is "Scrubbing?"
"Scrubbing" is the process of cleaning up errors in collected data. As your users are out scanning assets at the receiving dock, performing inventories, IMACs, audits or other activities involving data collection, mistakes will be made. Some common mistakes users make:
- User scans a serial number tag instead of an asset tag
- User creates a new model and select the wrong asset type
- User creates a new assignee and forgets the assignee code
There are any number of mistakes users can make, and if the data flows directly into your database, then the quality of your data will degrade. Scrubbing is the process of checking the data for problems and fixing errors before the changes are accepted into the database. This is the key difference between AssetTrack and other barcoding solutions: AssetTrack is the complete solution by providing scrubbing tools in addition to collection tools.
Accessing data in the Queue
The Queue is accessed via the Management Console. To access the Queue:
- Log in to the Management Console. The Management Console main window appears.
- Double click the Queue icon in the Server Navigator pane to the left. The Queue Navigator panel opens below the Server Navigator.
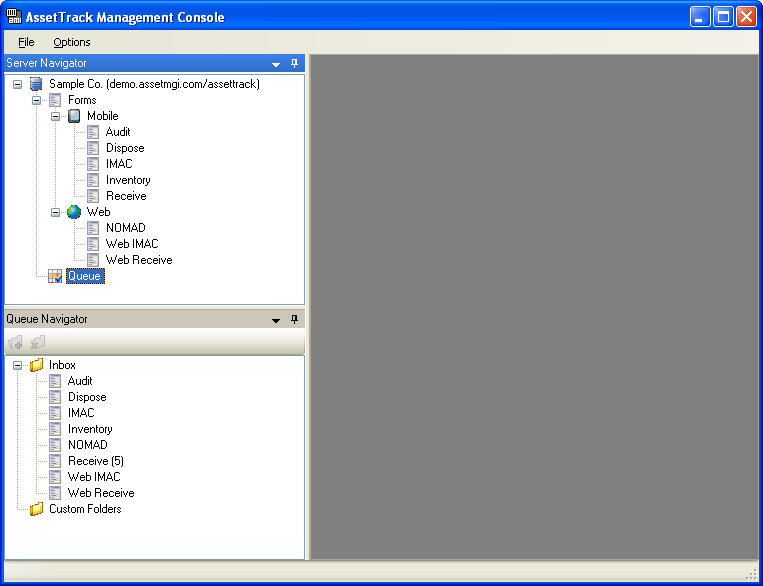
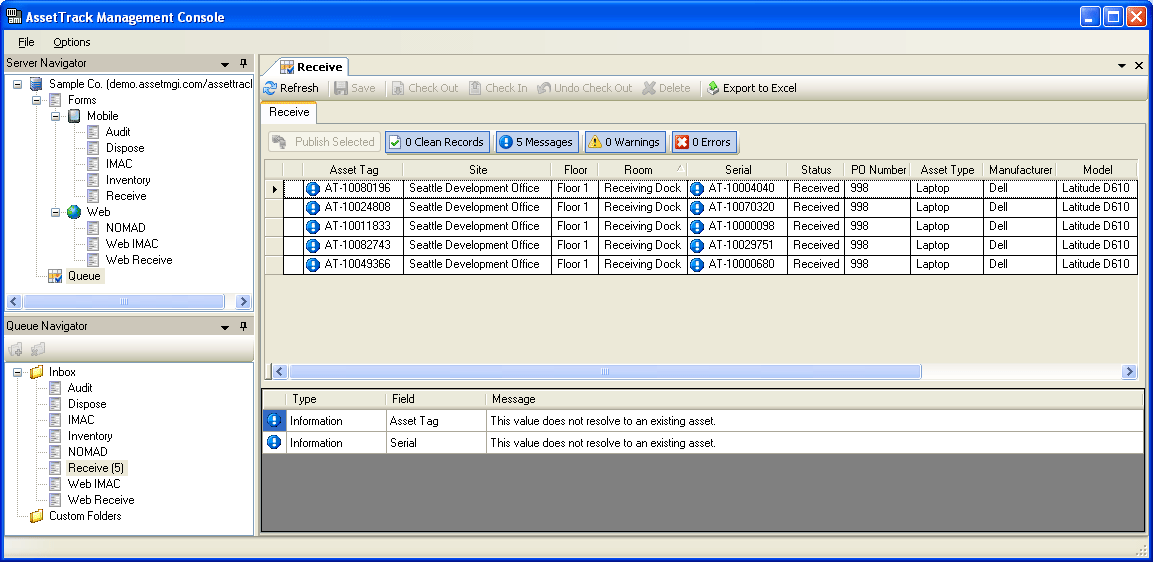
- When the Queue Navigator is displayed, each of the forms you have defined are displayed underneath the "Inbox." The Inbox is the location where uploaded data is delivered. In the above example, you can see that five records have been collected and uploaded using the Receive form. To view those records, double click the Receive folder. The Receive inbox folder and all the collected records it contains will be opened in the right-hand Workspace panel.