Using the procurement module with the CA integration
What is the procurement module and do I need it?
CA APM and Service Desk products are designed to deal with assets, e.g. setting and changing an asset's serial number, location, assignee, and lifecycle status. For example, you can express that an asset has changed its status from "Ordered" to "Received" and express that its location is now "North Loading Dock". You can even set the PO number on which the assets were ordered. But within CA APM and Service Desk products, you cannot easily express "I'm expecting 10 Dell Latitude D810 laptops on PO12345 and I've received five of them." In addition, APM and Service Desk don't readily support the concept of consumable assets like keyboards and mice that are tracked in quantity but not individually tagged and tracked.
- Your procurement system needs to know, most importantly, if a PO has been fully received and that the correct items were shipped. This way they know whether they can pay the vendor or not.
- APM/Service Desk needs to track certain non-consumable assets.
The AssetTrack procurement module allows you to handle this business scenario with a single workflow and ensure that both systems get what they need.
On this page:
System integration: How the procurement module works
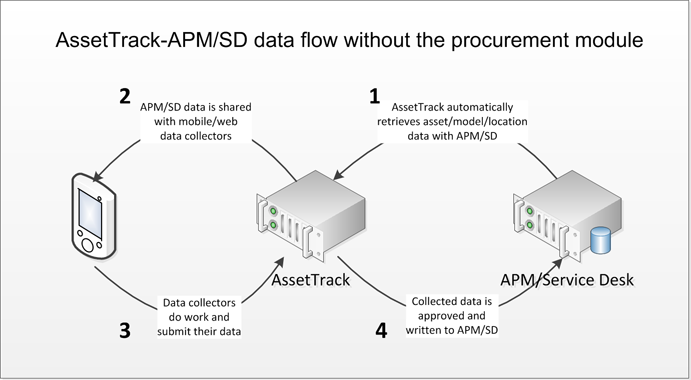
The diagram above illustrates AssetTrack integrated with APM without the procurement module. In this configuration, APM/Service Desk is considered the authoritative repository of record for assets, and AssetTrack creates or updates the asset records in APM/Service Desk.
The data flow is as follows:
- AssetTrack imports assets and other domain data (e.g. contacts, models, locations, organizations/departments) from APM/SD. This happens with an automated, scheduled import process.
- Mobile devices (and web forms) download APM/SD data from AssetTrack Server.
- Users collect asset data in the field and this is sent to AssetTrack - specifically the queue where data quality rules are applied.
- Approved, validated asset data is published to APM/SD.
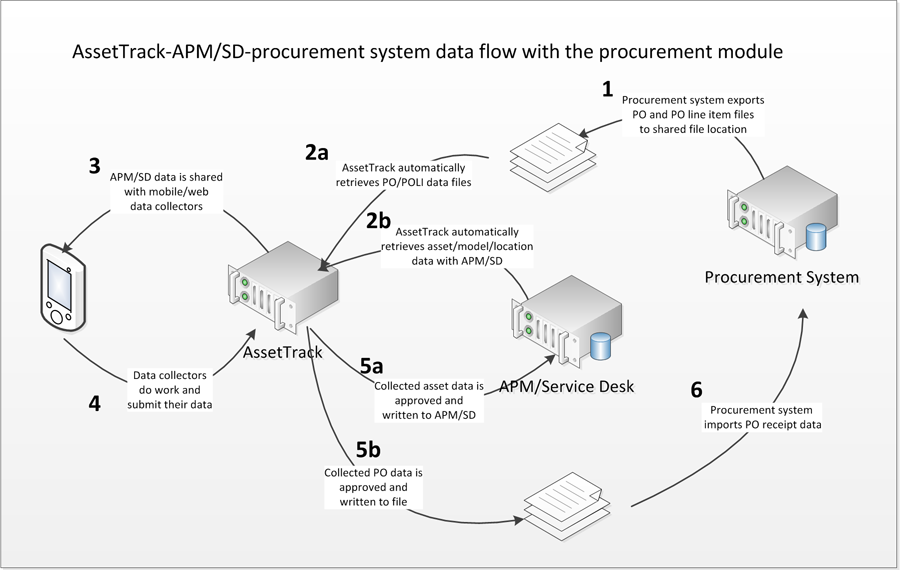
The diagram above illustrates AssetTrack integrated with APM with the procurement module. In this configuration, AssetTrack and APM. This configuration allows users to act on assets only.
- The procurement system exports purchase order (PO) and purchase order line item (POLI) data to text files in a file location accessible to AssetTrack. The data in the text files must conform to /wiki/spaces/DOC3/pages/2034346.
- The AssetTrack scheduled import process runs and imports data from two sources: The text files produced in Step #1 and also the APM/SD database (aka the MDB).
- Mobile devices (and web forms) download the PO data and APM/SD data from AssetTrack Server.
- Users receive consumable and non-consumable assets in the field and this is sent to AssetTrack - specifically the queue where data quality rules are applied.
- Approved, validated asset data is published to APM/SD and PO data is written to a text file.
- The procurement system imports the PO data.
Configuring the procurement module
License
To run the procurement module, there is no need to install additional components. AMI provides a license key file that specifies that you're authorized to use the procurement module. Once the license file is uploaded, you'll be able to create procurement module forms and collect PO data.
Configuring the flow of data to and from the procurement system
Steps #1 and #6 in the data flow above require your procurement system to export and import data, respectively. This typically requires developers that are familiar with your procurement system to write scripts to accomplish this. They will need to review the article /wiki/spaces/DOC3/pages/2034346 to design the export scripts and Authoring XSL scripts for file publishing to specify the desired output format.
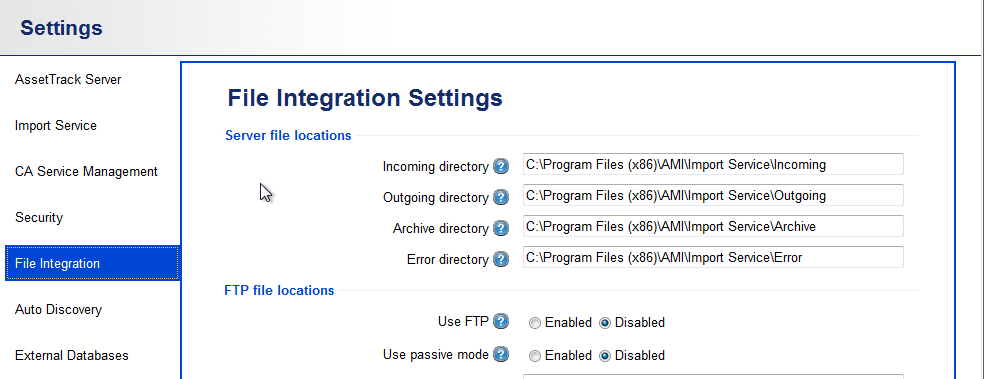
One your procurement system developers have created the export and import scripts, you will need to agree on a file location for the files. Within AssetTrack Server's Settings page, you should specify the following:
- Incoming directory: This is the file path that AssetTrack will scan for the files that were exported from the procurement system.
- Outgoing directory: This is the file path where AssetTrack will write the collected PO and asset information. The scripts that will import data into the procurement system should look in this directory for the import files.